# JavaScript SDK
# Overview
This is an SDK for creating web applications.
Media communication (video and voice calls), screen sharing, and data communication (chat functions, etc.) can be realized.
The web application you create can also be used with a browser application on your smartphone.
# Download the SDK
# Download the SDK Using npm
Execute the following command under the environment where npm is installed.
$ npm install skyway-js
Import a package on a script, using require or import.
// require
const Peer = require('skyway-js');
const peer = new Peer({key: 'YOUR-API-KEY'});

// import
import Peer from 'skyway-js';
const peer = new Peer({key: 'YOUR-API-KEY'});
# When using a CDN
Add the following script elements to your HTML file.
<script src="https://cdn.webrtc.ecl.ntt.com/skyway-4.4.5.js"></script>
skyway-4.4.5.js is the latest version.
Ref. GitHub Releases
To use the compressed version, add .min to the end of the file name, like skyway-4.4.5.min.js.
# Verified Browser
We have confirmed that the latest version of the SDK works with the following browsers.
- Google Chrome:latest two stable versions
- Firefox:latest two stable versions
- Safari:latest two stable versions
- Microsoft Edge:latest two stable versions (based on Chromium)
# Tutorial
Let's create a simple one-to-one video calling application.
The complete version can be found at here
The latest version of Google Chrome and Firefox are the browsers that have been checked for operation.
# 1. Preparation.
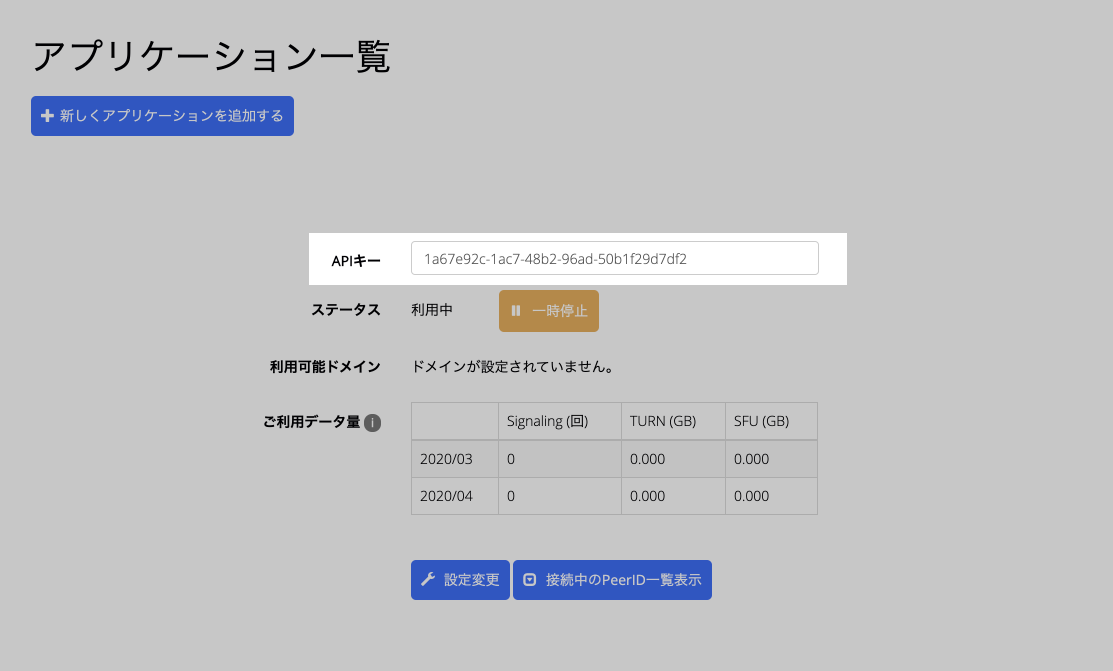
# 1-1. Get API key, add an available domain
Log in to the dashboard and do the following three things.
- Press the "Create a new application" button.

- Add "localhost" to "Available Domains" and click "Create Application".
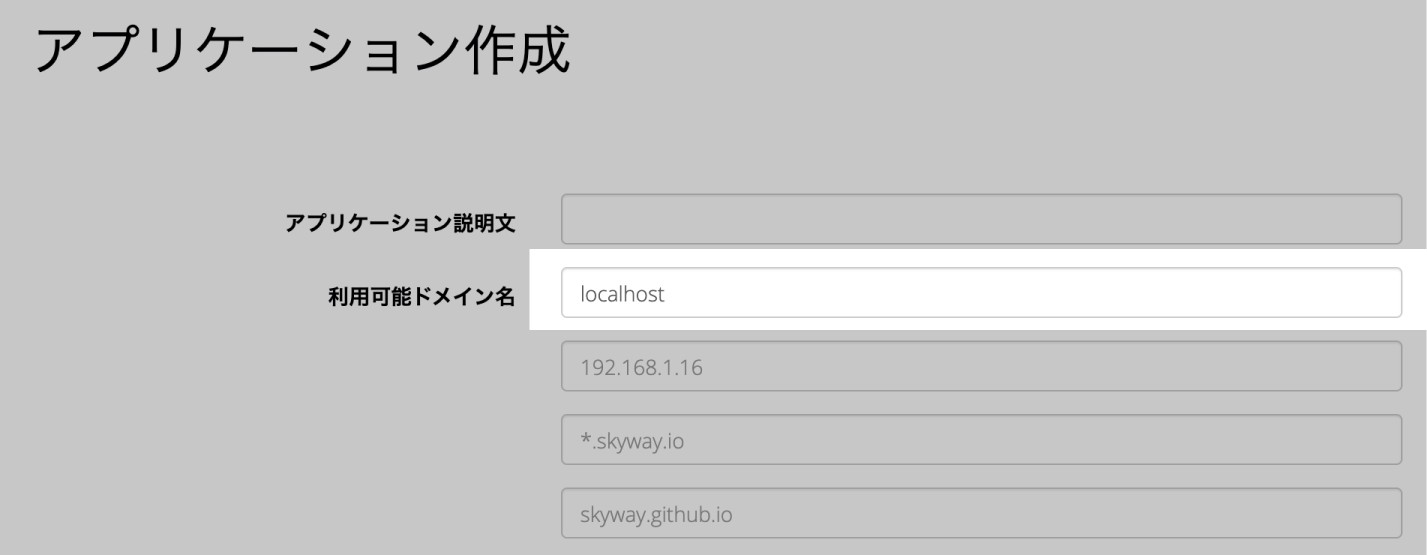
- Copy and save the API key.
# 1-2. Preparing a local web server
If you want to use the WebRTC features in a local environment, you need to use a web server.
Here are some of the ways to do this.
Recommendation: Use Visual Studio Code extension Live Server
Run the following commands in Mac Terminal or Windows Command Prompt/Git Bash, depending on your environment
# python 2.X
$ python -m SimpleHTTPServer 8080

# python 3.X
$ python -m http.server 8080

# ruby
$ ruby -run -e httpd . -p 8080

# php
$ php -S localhost:8080
- Install and run XAMPP on windows
# 2. Create an Application
# 2-1. Creating HTML
First, create an HTML file.
<!DOCTYPE html>
<html lang="ja">
<head>
  <meta charset="UTF-8">
  <meta name="viewport" content="width=device-width, initial-scale=1.0">
  <title>ECLWebRTC Tutorial</title>
</head>
<body>

</body>
</html>
# 2-2. Importing SDK
Import the SDK with CDN, add the following in the head tag.
<head>
  <meta charset="UTF-8">
  <meta name="viewport" content="width=device-width, initial-scale=1.0">
  <script src="https://cdn.webrtc.ecl.ntt.com/skyway-4.4.5.js"></script>
  <title>ECLWebRTC Tutorial</title>
</head>
# 2-3. Acquisition of camera images and microphone audio
Acquire the camera image and microphone audio.
First, let's create an area to display the camera video and add a video element to the body element.
<body>
  <video id="my-video" width="400px" autoplay muted playsinline></video>
</body>
Next, add a script element at the bottom of the body element and write the process.
In order to get camera images and microphone audio with a web browser, the browser standard API getUserMedia is used.
They set the stream object (their own camera video) obtained with getUserMedia to the video element.
<script>
  let localStream;

  // camera image acquisition
  navigator.mediaDevices.getUserMedia({video: true, audio: true})
    .then( stream => {
    // On success, the video element is set to a camera image and played back.
    const videoElm = document.getElementById('my-video');
    videoElm.srcObject = stream;
    videoElm.play();
    // Save the camera image to a global variable so that it can be returned to the other party when a call comes in.
    localStream = stream;
  }).catch( error => {
    // Outputs error log in case of failure.
    console.error('mediaDevice.getUserMedia() error:', error);
    return;
  });
</script>
Now, let's start the local server once and see if the camera image is displayed.
CAUTION
To protect the user's privacy, a dialog will appear asking for permission to use the camera. Please allow it.
# 2-4. Create a Peer
We will add processing to communicate with the other party.
First, we create an instance of an object called a Peer, which is the unit of communication center.
Optionally, key is the first saved API key.
The debug specifies the level of log output. 3 specifies the level of log output for development.
  //Peer作成
  const peer = new Peer({
    key: 'Your API KEY',
    debug: 3
  });
# 2-5. Get PeerID
In order to connect with them, you need their phone number.
The phone number in ECLWebRTC is PeerID.
The PeerID is obtained by an event called the open event of the Peer object, which occurs when the connection with ECLWebRTC's signaling server is successful.
In the event, insert the retrieved PeerID into the p element.
<body>
  <video id="my-video" width="400px" autoplay muted playsinline></video>
  <p id="my-id"></p>
</body>
//PeerID取得
peer.on('open', () => {
    document.getElementById('my-id').textContent = peer.id;
});
Let's check once on the local server to see if we can get PeerID.
It is a success if 16 random alphanumeric characters are displayed on the screen.
# 2-6. Outgoing processing
Add outgoing processing.
Let's add the following three in the body element.
- Text area to fill in the Peer ID of the person
- call button
- A video element that shows the other party's video when a call comes in.
<body>
  <video id="my-video" width="400px" autoplay muted playsinline></video>
  <p id="my-id"></p>
  <input id="their-id"></input>
  <button id="make-call">Make Call</button>
  <video id="their-video" width="400px" autoplay muted playsinline></video>
</body>
Next, add the outgoing process to be executed when the button is pressed.
Add the call method of peer to the button pressing process.
The call method takes the following two arguments.
- PeerIDs filled in in the text area
- The first camera image I prepared (local stream)
The call method allows you to get the MediaConnection object when you connect to the other party.
This MediaConnection contains the video of the other party.
The setEventListener function takes MediaConnection as an argument to display the image of the other party on the screen.
In the on method of the mediaConnection function, a listener for the stream event that occurs when the video of the other party is acquired.
In the event listener, we describe how to set the video of the other party to the video element.
// Transmission processing
document.getElementById('make-call').onclick = () => {
  const theirID = document.getElementById('their-id').value;
  const mediaConnection = peer.call(theirID, localStream);
  setEventListener(mediaConnection);
};

// Function to set an event listener
const setEventListener = mediaConnection => {
  mediaConnection.on('stream', stream => {
    // Set a camera image to the video element and play it
    const videoElm = document.getElementById('their-video')
    videoElm.srcObject = stream;
    videoElm.play();
  });
}
# 2-7. Inbound processing
Finally, add inbound processing.
The call event of a Peer object is fired when a connection request is received from the peer.
A mediaConnection object can be retrieved in the event of an outbreak.
The answer method of the mediaConnection object takes the localStream variable saved at the time of camera image acquisition as an argument and returns the
Return your camera image to the other party.
Then, we add the event listener function we prepared earlier, and set the video element to the other party's video in the same way as before.
// Inbound processing
peer.on('call', mediaConnection => {
  mediaConnection.answer(localStream);
  setEventListener(mediaConnection);
});
It is now complete.
# 3. Execution
Display two pages in a separate tab, copy and paste the PeerID of the other into the text area, and press the Call button.
If two images are displayed on either page, the communication is successful. It is now complete.
Upload your finished application using a free hosting service such as Github Pages or Netlify and try to connect from multiple devices.
Be sure to add the domain you are uploading to to the "Available Domains" section of your dashboard.
CAUTION
The video element has a muted attribute added to it to prevent howling. Please remove it if necessary.
# 4.TIPS
There are various other events in the Peer object.
# error event
It will ignite in case of any error. If an error occurs, a warning dialog can be displayed.
peer.on('error', err => {
    alert(err.message);
});
# close event
It will ignite when the connection with the Peer is broken.
peer.on('close', () => {
  alert('We have lost communication.');
});
# Sample Code
← Introduction iOS SDK →