# iOS SDK
# Download the SDK
# Download the SDK Using CocoaPods
- Add the the text below to your Podfile.
Podfile
platform :ios,'8.0'
use_frameworks!

def install_pods
  pod 'SkyWay'
end

target 'source code directory(rewrite)' do
  install_pods
end
- Install with the following command.
$ pod setup
$ pod install
# Download the SDK as a file
# Supported OS’s
- iOS 10+
- iPadOS 13+
# iOS SDK Tutorial
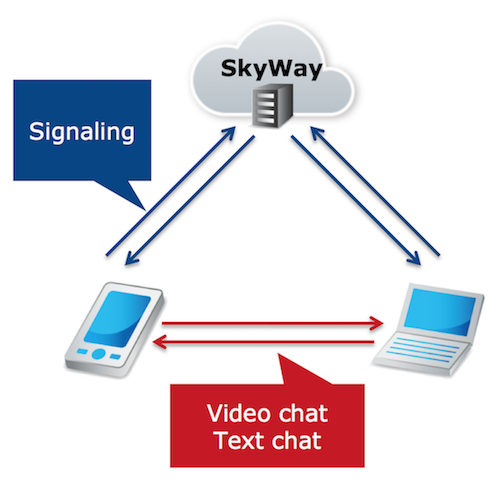
In the tutorial, you will create a one-on-one video chat app using the basic features of the iOS SDK. The app will have the ability to display a list of users currently connected to the server, select which user to call, call, answer and hang up a one-to-one video conversation.
The application to be created in this tutorial will be the same as one-to-one video chat provided in the samples. If you want to try the finished app, download the source code and follow "build" section of this tutorial.
# Preparations
# Obtain an ECLWebRTC API Key
Login to the dashboard and create an application to obtain an API key.
Application settings on the Dashboard are as follows.
| Field | Explanation of Item | What to set it to for this tutorial |
|---|---|---|
| Application Description | A short description of the application. This is only used when displaying applications on the Dashboard to help identify them. Must be less than 128 characters. | ECLWebRTC Tutorial Application |
| Available Domains | Domain names of the servers that will be serving the app. Multiple domains can be specified. Example: foobar.com | localhost |
| Enabled TURN | Allow users to use TURN (Traversal Using Relay around NAT) servers. The TURN server makes communication possible by relaying media and data, even when P2P communication is not possible because the communication has to go through firewalls. The TURN server closest to the user will be selected automatically. | ON |
| Enable SFU | Allow users to use SFU (Selective Forwarding Unit) server. SFU's allow sending/receiving video and voice through a central media relay server, avoiding many disadvantages of using multiple P2P connections. Please refer to the SFU documentation for details. | ON |
| Enabled listAllPeers API | Allow users to use the listAllPeers API, which gets a list of the PeerIDs of all connected users. Refer to API Reference for details. | ON |
| Enabled Peer authentication | Enables authentication function to prevent unauthorized use. Refer to this GitHub repository for details on how to use authentication. | OFF |
# Preparing the development environment
We have verified this tutorial with the following environment.
- Xcode version 8.1
- Verified device
- iPod touch (MKH22J/A)
- iOS version
- 10.3.2
- Development language
- Objective-C
- Authentication
- Make sure Peer authentication is turned OFF in the dashboard.
# Creating the project
Download the Xcode project used for this tutorial by cloning the repository below.
# Add the SDK to the project
In this tutorial, we will manually download and add the SDK.
- Download the SDK on GitHub.
- Unzip the file and move
SkyWay.frameworkdirectly into theskyway-ios-sdk-tutorialdirectory. - Double click
skyway-ios-sdk-tutorial.xcodeprojto open the project. - Right-click on the file tree on the left panel and select [ Add File to… ] to add
SkyWay.framework. - Delete
SkyWay.frameworkfrom [ General ] → [ Linked Frameworks and Libraries ] . - Add
SkyWay.frameworkto [ General ] → [ Embedded Binaries ].
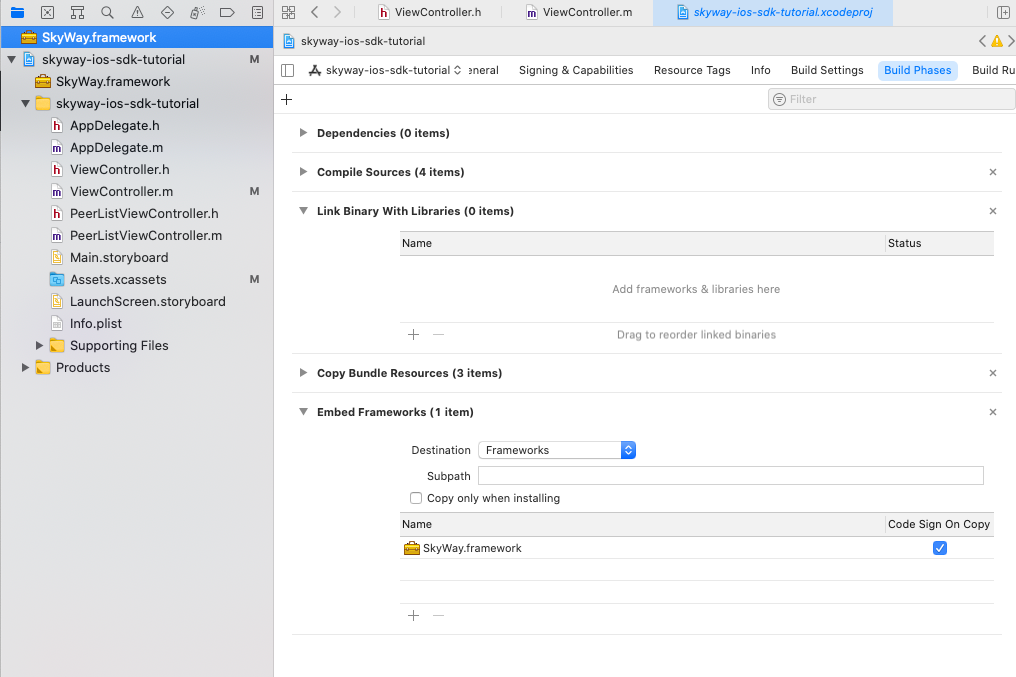
Here is an overview of each of the files contained in the project.
- ViewController.m
- Contains the main code for this app. You will be working with this file exclusively for this tutorial.
- PeerListViewController.m
- Generates the UITableView to display a list of PeerID.
- The completed version is included in the repository and will not be referenced in this tutorial.
- storyboard
- The completed version is included in the repository and will not be referenced in this tutorial.
# Import the header file
Add the header file for the SDK to ViewController.h.
Objective-C
#import <SkyWay/SKWPeer.h>
# Build
- From [ General ] → [ Identity ], update the Bundle Identifier as appropriate.
- Select account from Signing > Team used for Build.
- Connect the iOS device and select build.
We expect some errors during here but the preparation is complete if the build passes.

# Connect to the ECLWebRTC server
# Defining variables
Add constants that are used in the program.
Set kAPIkey to the API key that was generated on the Dashboard earlier.
For kDomain, specify one of the Available Domains you set in the Dashboard (e.g. "localhost").
Objective-C
//
// Set your APIkey and Domain
//
static NSString *const kAPIkey = @"apikey";
static NSString *const kDomain = @"domain";
Declare instance variables used in the program.
_peer: Peer Object_localStream: Own MediaStream Object_remoteStream: Partner MediaStream Object_mediaConnection: MediaConnection Object
Objective-C
//
// Instance declaration
//
@interface ViewController () {
    SKWPeer*			_peer;
    SKWMediaStream*		_localStream;
    SKWMediaStream*		_remoteStream;
    SKWMediaConnection*	_mediaConnection;

    NSString*			_strOwnId;
    BOOL				_bConnected;
}
Declare properties and set up dealloc of instance variables.
localView: Renderer view object to display your own videoremoteView: Renderer view object to display the partner’s video
Objective-C
//
// Property declaration
//
@property (weak, nonatomic) IBOutlet UILabel*   idLabel;
@property (weak, nonatomic) IBOutlet UIButton*  actionButton;
@property (weak, nonatomic) IBOutlet SKWVideo*  localView;
@property (weak, nonatomic) IBOutlet SKWVideo*  remoteView;

@end

@implementation ViewController

     :
     :

//
// dealloc
//
- (void)dealloc {
    _localStream = nil;
    _remoteStream = nil;
    _strOwnId = nil;
    _mediaConnection = nil;
    _peer = nil;

}

     :
     :

@end
# Create Peer Object
Create a Peer object in the viewDidLoad method.
When creating the Peer object, specify the API key, domain name and debug level by using the SKWPeerOption class.
Objective-C
- (void)viewDidLoad {
    [super viewDidLoad];

    //
    // Initialize Peer
    //
    SKWPeerOption* option = [[SKWPeerOption alloc] init];
    option.key = kAPIkey;
    option.domain = kDomain;
    option.debug = 3;
    _peer	= [[SKWPeer alloc] initWithId:nil options:option];

    // continued in the receiving calls section...
Refer to API Reference for other options that can be specified in Peer object.
# Handling connection success, errors and disconnections
Add the appropriate event callbacks to handle each event.
# Open Event
Emitted when the connection to the ECLWebRTC server is ready to use. You should wait for this event before calling any other methods on the Peer object. An ID which uniquely identifies the client, known as the PeerID, can be obtained from the callback function. The PeerID can be specified or randomly generated on the server if one isn't specified. This code displays the PeerID after the connection to the server is established.
Objective-C
//
// Set Peer event callbacks
//

// OPEN
[_peer on:SKW_PEER_EVENT_OPEN callback:^(NSObject* obj) {

    // Show my ID
    _strOwnId = (NSString*) obj;
    _idLabel.text = _strOwnId;

    // continued below ...
}];
# Obtaining video/audio streams from the camera/microphone
In the callback of the OPEN event, add code to get media streams from the camera/microphone.
# Options
Options for getting video/audio can be set by SKWMediaConstraints class. Here is a simple summary of some of the options.
maxWidth: The upper limit in pixels of the horizontal size of the videomaxHeight: The upper limit in pixels of the vertical size of the videocameraPosition: Select which device camera to use(defaults to front camera)- set to
SKW_CAMERA_POSITION_FRONTto use the front camera - set to
SKW_CAMERA_POSITION_BACKto use the back camera
- set to
Refer to API Reference for other options.
Objective-C
// OPEN
[_peer on:SKW_PEER_EVENT_OPEN callback:^(NSObject* obj) {

    // ... continued from above

    // Set MediaConstraints
    SKWMediaConstraints* constraints = [[SKWMediaConstraints alloc] init];
    constraints.maxWidth = 960;
    constraints.maxHeight = 540;
    constraints.cameraPosition = SKW_CAMERA_POSITION_FRONT;

    // continued below ...
}];
# Playing the MediaStream
Initialize the SKWNavigator class, specify the constraints for the getUserMedia method and execute it to obtain your local MediaStream (local stream).
Use the addVideoRenderer method to allocate a video renderer (SKWVideo object) for the MediaStream object you got from getUserMedia.
Objective-C
// OPEN
[_peer on:SKW_PEER_EVENT_OPEN callback:^(NSObject* obj) {
    // ... continued from above

    // Get a local MediaStream & show it
    [SKWNavigator initialize:_peer];
    _localStream = [SKWNavigator getUserMedia:constraints];
    [_localStream addVideoRenderer:_localView track:0];
}];
# Error Event
Emitted when any error occurs. Makes it possible to determine the cause of the error and handle it appropriately (e.g. displaying the message in the log).
Objective-C
// ERROR
[_peer on:SKW_PEER_EVENT_ERROR callback:^(NSObject* obj) {
    SKWPeerError* error = (SKWPeerError*)obj;
    NSLog(@"%@",error);

}];
# Close Event
Emitted when the connection with another Peer is broken. We don't handle this event in this tutorial.
Objective-C
// CLOSE
[_peer on:SKW_PEER_EVENT_CLOSE callback:^(NSObject* obj) {}];
# Calling, Disconnecting and Receiving calls
# Calling
Select the PeerID of the partner you want to call and call him/her.
# Obtain the PeerID of your partner
Tap the actionButton. If you aren't already connected to a peer, use the listAllPeers() method to obtain a list of all other user's PeerIDs. Delete your own ID from the obtained list and show the list with the PeerListViewController.
Objective-C
//
// Action for actionButton (make/hang up a call)
//
- (IBAction)onActionButtonClicked:(id)sender {

    if(nil == _mediaConnection) {

        //
        // Select remote peer & make a call
        //

        // Get all IDs connected to the server
        [_peer listAllPeers:^(NSArray* aryPeers){
            NSMutableArray* maItems = [[NSMutableArray alloc] init];
            if (nil == _strOwnId) {
                 return;
            }

            // Exclude my own ID
            for (NSString* strValue in aryPeers) {
                if (NSOrderedSame != [_strOwnId caseInsensitiveCompare:strValue]) {
                    [maItems addObject:strValue];
                }
            }

            // Show IDs using UITableViewController
            PeerListViewController* vc = [[PeerListViewController alloc] initWithStyle:UITableViewStylePlain];
            vc.items = [NSArray arrayWithArray:maItems];
            vc.delegate = self;

            UINavigationController* nc = [[UINavigationController alloc] initWithRootViewController:vc];
            dispatch_async(dispatch_get_main_queue(), ^{
                [self presentViewController:nc animated:YES completion:nil];
            });

            [maItems removeAllObjects];

        }];
    }

    else {

    }
}
# Connecting to the partner
If a PeerID is selected in the PeerListViewController, the didSelectPeer method will be called. Call the callWithId method, passing the PeerID of the partner and your own localStream as arguments, to connect to the specified PeerID.
After calling, set up the necessary event callbacks.
Details of setMediaCallbacks will be explained later.
Objective-C
//
// Create a MediaConnection
//
- (void) didSelectPeer:(NSString *)peerId {
    _mediaConnection = [_peer callWithId:peerId stream:_localStream];
    [self setMediaCallbacks];
}
# Disconnecting
Disconnect the connection with the partner.
# Terminate MediaConnection
If the connection is alive when the actionButton is tapped, use the close method of the MediaConnection object to disconnect the specified MediaConnection and clean up using closeRemoteStream, which will be explained later.
Objective-C
//
// Action for actionButton (make/hang up a call)
//
- (IBAction)onActionButtonClicked:(id)sender {

    if(nil == _mediaConnection) {

     :
     :

    else {

        //
        // hang up a call
        //

        [self closeRemoteStream];
        [_mediaConnection close];
    }
}
# Close MediaStream
When the close method of the MediaConnection object is called, use the removeVideoRenderer method to remove the video renderer assigned to the MediaStream.
Objective-C
//
// Close & release a remote MediaStream
//
- (void) closeRemoteStream {
    if(nil == _remoteStream) {
        return;
    }

    if(nil != _remoteView) {
        [_remoteStream removeVideoRenderer:_remoteView track:0];
    }

    [_remoteStream close];
    _remoteStream = nil;
}
# Cleaning up
You should unset the callback functions set above when the MediaConnection is disconnected.
In addition, unsetPeerCallbacks will be used when we destroy Peer objects. It will not be used in this tutorial because we will not destroy any Peer objects.
Objective-C
//
// Unset callbacks for PEER_EVENTs
//
- (void)unsetPeerCallbacks {
    if (nil == _peer) {
        return;
    }

    [_peer on:SKW_PEER_EVENT_OPEN callback:nil];
    [_peer on:SKW_PEER_EVENT_CONNECTION callback:nil];
    [_peer on:SKW_PEER_EVENT_CALL callback:nil];
    [_peer on:SKW_PEER_EVENT_CLOSE callback:nil];
    [_peer on:SKW_PEER_EVENT_ERROR callback:nil];
}

//
// Unset callbacks for MEDIACONNECTION_EVENTs
//
- (void)unsetMediaCallbacks {
    if(nil == _mediaConnection) {
        return;
    }

    [_mediaConnection on:SKW_MEDIACONNECTION_EVENT_STREAM callback:nil];
    [_mediaConnection on:SKW_MEDIACONNECTION_EVENT_CLOSE callback:nil];
    [_mediaConnection on:SKW_MEDIACONNECTION_EVENT_ERROR callback:nil];
}
# Receiving calls
Answer when a partner requests a connection.
When someone is trying to establish a media connection with you, SKW_PEER_EVENT_CALL will fire. Call the answer method on the MediaConnection object you get from the callback to accept the connection.
If you set your own _localStream, you will be able to send video and voice to your partner.
Use setMediaCallbacks to set event handlers like you did after callWithId. Details will be explained later.
Objective-C
- (void)viewDidLoad {
    [super viewDidLoad];

    // ... continued from the create Peer section

    // CALL (Incoming call)
    [_peer on:SKW_PEER_EVENT_CALL callback:^(NSObject* obj) {
        if (YES == [obj isKindOfClass:[SKWMediaConnection class]]) {
            _mediaConnection = (SKWMediaConnection *)obj;
            [self setMediaCallbacks];
            [_mediaConnection answer:_localStream];
        }
    }];
# Event handlers on the MediaConnection object
Here we set up the event handlers on the MediaConnection object we got above.
SKW_MEDIACONNECTION_EVENT_STREAM will fire when a MediaStream is received from your partner.
In the callback, update the connection status on the UI and use the addVideoRenderer method on the MediaStream object of the partner, to play the received stream.
Objective-C
//
// Set callbacks for MEDIACONNECTION_EVENTs
//
- (void)setMediaCallbacks {
    if (nil == _mediaConnection) {
        return;
    }

    [_mediaConnection on:SKW_MEDIACONNECTION_EVENT_STREAM callback:^(NSObject* obj) {
        if (YES == [obj isKindOfClass:[SKWMediaStream class]]) {
            if (YES == _bConnected) {
                return;
            }

            // Change connection state
            _bConnected = YES;
            [self updateActionButtonTitle];

            // Get a remote MediaStream & show it
            _remoteStream = (SKWMediaStream *)obj;
            dispatch_async(dispatch_get_main_queue(), ^{
                [_remoteStream addVideoRenderer:_remoteView track:0];
            });

        }
    }];

    // continues below ...
}
SKW_MEDIACONNECTION_EVENT_CLOSE will fire if the partner disconnects.
The necessary steps to clean up will be run in the callback. Details will be explained later.
Objective-C
//
// Set callbacks for MEDIACONNECTION_EVENTs
//
- (void)setMediaCallbacks {

    // ... continued from above

    [_mediaConnection on:SKW_MEDIACONNECTION_EVENT_CLOSE callback:^(NSObject* obj) {
        if (NO == _bConnected) {
            return;
        }

        [self closeRemoteStream];
        [self unsetMediaCallbacks];
        _mediaConnection = nil;

        _bConnected = NO;
        [self updateActionButtonTitle];

    }];

    // continues below ...
}
SKW_MEDIACONNECTION_EVENT_ERROR will fire when any error occurs. Makes it possible to determine the cause of the error and handle it appropriately (e.g. displaying the message in the log)
Objective-C
//
// Set callbacks for MEDIACONNECTION_EVENTs
//
- (void)setMediaCallbacks {

    // ... continued from above

    [_mediaConnection on:SKW_MEDIACONNECTION_EVENT_ERROR callback:^(NSObject* obj) { }];
}
# Setup UI
Add methods related to the UI. As actionButton is used in toggle mode, change the label depending on the connection status.
Objective-C
//
// UIViewcontroller lifecycle
//
- (void)viewWillAppear:(BOOL)animated {
    [super viewWillAppear:animated];
    [[UIApplication sharedApplication] setIdleTimerDisabled:YES];
    [self updateActionButtonTitle];
}

- (void)viewDidDisappear:(BOOL)animated {
    [[UIApplication sharedApplication] setIdleTimerDisabled:NO];
    [super viewDidDisappear:animated];
}

- (void)didReceiveMemoryWarning {
    [super didReceiveMemoryWarning];
}

//
// Update actionButton title
//
- (void)updateActionButtonTitle {
    dispatch_async(dispatch_get_main_queue(), ^{
        NSString* title = (_bConnected) ? @"Hang up" : @"Make Call";
        [_actionButton setTitle:title forState:UIControlStateNormal];
    });

}
# Switching Cameras
Finally, we're going to add a way to switch between device cameras.
Use the getCameraPosition method to obtain the camera position used by the specified media stream. Then, set to the other setting to toggle cameras.
Objective-C
//
// Action for switchCameraButton
//
- (IBAction)onSwitchCameraButtonClicked:(id)sender {
    if(nil == _localStream) {
        return;
    }

    SKWCameraPositionEnum pos = [_localStream getCameraPosition];
    if(SKW_CAMERA_POSITION_BACK == pos) {
        pos = SKW_CAMERA_POSITION_FRONT;
    }
    else if(SKW_CAMERA_POSITION_FRONT == pos) {
        pos = SKW_CAMERA_POSITION_BACK;
    }
    else {
        return;
    }

    [_localStream setCameraPosition:pos];
}
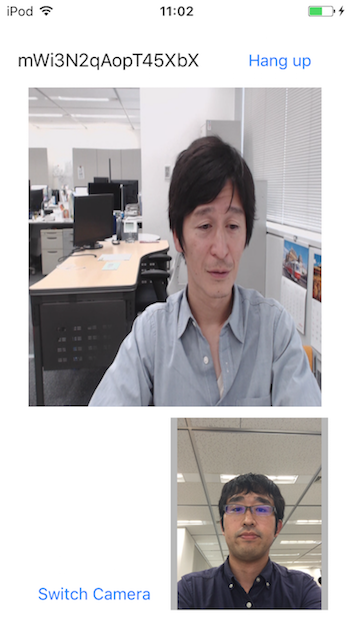
# Trying it out
Build and deploy to two devices. Call a PeerID obtained using listAllPeers. It should connect and a video chat between the two devices should start. If you only have one iOS device, you can try connecting to a JavaScript web-app that uses the same API key.
# Sample Code
Sample code for Objective-C and Swift is available.
| Objective-C | ||
|---|---|---|
| One-on-One、P2P | video chat | text chat |
| Multi-party、P2P | video chat | text chat |
| Multi-party、SFU | video chat | text chat |
| Swift | ||
|---|---|---|
| One-on-One、P2P | video chat | text chat |